Many of you are familiar with WordPress and with its login page wp-login.php. There is nothing wrong with it, the form works fine and it does what it’s supposed to do.
But for many reasons developers wants to change it, the most commune one is to have a different style for it, so the login / register form will look much like the theme design and will no confuse visitors. After all, if a hook exists for that, it means that there is nothing wrong customizing it.
If you want to have a custom login form on your WordPress website than you will have to google “custom WordPress login form”, there are a lot of tutorial around the web to help you achieve that.
On this post I’m not going to do a tutorial on how to have a custom WordPress login form but I’m going to show how add placeholder on WordPress login form and how is the right way to do it.
The default usage of wp_login_form() function is as below:
Now if we put this code somewhere on our WordPress theme files like header.php it will generate the custom login form, of course you will have to put it in the right place where you will want the form to be showed.
After showing the form we will have to add some css styles for it and hide the username and password label.
Now that we have hidden labels we will need to have placeholders otherwise the form will make no sense. There is no build in hook for doing that on WordPress but we will have to do it by using jQuery
Supposing that we have a script on our theme named theme.js, what we are going to do first is to find the WordPress function used to enqueue the script and modify it to add localize support for our form placeholder.
Remember, if you want the localize support to work you will need to register script before than enqueue it because if you will enqueue it without registering before the localize support will not work
Now that we have added localize support for our placeholders the next thing to do is adding to lines on our theme.js file as below:
Before starting lets have a complex WordPress query with custom meta fields
Some times ago for testing purpose i created a WordPress plugin, only for personal use.
What this plugin does is very simple, it adds some custom fields (metaboxes) on each WordPress post where user can choose to make a post a sticky post, with the option to choose and expiration method with two options manual and automatic.
If user will check manual method then he needs to come back to that post and uncheck the option Make this post sticky.
If user will check automatic another option will be visible, where he can check expiration date and time, after the selected time will pass the post will be removed from sticky post.
Plugin functions outputs only one post, because it removes every custom fields added by the plugin from all other posts if a new post is set as sticky. The sticky option used here doesn’t have to do with the build in sticky option used on WordPress.
The WordPress query used to loop through posts was a bit complex because it need to get one post from all posts where the custom field was set for that post to be sticky and the Expiration method was set manual or automatic and if it was set automatic the current time must be greater or equal to the expiration time.
Everything works well. But for no reason i was searching on StackExchange and found a question where a user was trying to filter multiple custom fields with WordPress REST API 2 and the query was somehow complex as my query. So i though let’s give a try…
WordPress REST API with complex custom fileds
Lets go for a solution of filtering the same query using WordPress REST API v2
With WordPress REST API you may get posts from your website by using many filters including custom taxonomies.
But when it comes to filter posts by using meta fields is not that easy because by default filtering using meta fields is not allowed (for security reasons, if you will use this post to create a similar function on your website used on your own risk).It is not allowed by default but is not that this can’t be achieved by using built in hooks.
The rescue here is rest_query_vars. This hook will allow us to set custom query attributes to the allowed query variables. Here is how to use it:
add_filter( 'rest_query_vars', 'api_allow_meta_query' ); function api_allow_meta_query( $new_vars )
Adding this function on WordPress theme functions.php will allow us to filter the request using the new fields
For this test I created a new php file a putted it on another domain and created the function to get the post from my WordPress website and output it in the new domain.
The function used for retrieving the data from the WordPress site is as below:
/** * Created by PhpStorm. * User: emilushi * Date: 5/25/16 * Time: 1:17 PM */
Remember: for everything to work as needed you need to have cURL installed on your server, as well you need to have WP REST API v2 plugin installed on your WordPress website.
Let’s explain what this function does:
First we need to start a cURL session by using curl_init(), then we use set a variable for the current date and time by using new DateTime() which will be used to compare current time and the expiration time stored on meta filed.
Next step will be creating a variable which holds all the fields that will be used on the REST API filter. After creating the fields we will use, we need to convert them to an encoded query string by using http_build_query
After encoding our URL we start the transfer by using curl_setopt_array. After setting all the options used on the transfer we execute the cURL session by using curl_exec().
Final step is to decode and print the result by using json_decode(). This will output all the data transferred from the WordPress website using REST API v2.
Now you will have to loop through all the results you have received and show only those you will need and work a bit with HTML and CSS to have a nice view.
I hope you have enjoyed this post and as well hope that this post will help you a bit on what you want to achieve. If you will have any question when following the steps explained on the post please leave a comment and i will try to replay to you on time. Don’t forget to share it. All the bests!
Airsport.com is a website used for blogging about Air Sport Activities in Russia, as well they use Joomla and VirtueMart for selling online products related to Air Sport Activities. Dmitry came with a clear idea 🙂 He has a Joomla template from Joomla-Monster.com and his need was to create the same style used on the template for VirtueMart component and all other VirtueMart views and modules. What we did was: creating that unique style for VirtueMart product and category view and the home-page slider with module position inside it.
WordPress is the most powerful blogging platform on earth (I don’t know if aliens use it :-p), I’m not going much further about WordPress because if you have reached this post it means that you have searched google for WordPress cache solution or something else related to WordPress and you already know what WordPress is.
What is cache and do you need it?
Based on Wikipedia: “In computing, a cache is a component that stores data so future requests for that data can be served faster…”
So it means that cache can help us make our website faster.
But how? There are different type of cache: like server cache, browser cache etc.
Server cache for example a user visits the homepage of a website, when the user types the url on the address bar and hits enter a request has been sent to the server where the website is hosted, the server executes the corresponding script, in WordPress index.php, during the script execution a query has been sent to the database server, for example to load 10 recent posts. This query now is cached on RAM for a period of time (based on configuration). When the next visitor will come to the homepage of the website the query to load 10 recent posts will not be executed anymore from the server but the query result will be served directly from the RAM so the page will load faster.
Browser cache logic is the same with server cache but in the case of browser cache the files are cached (stored) on the user computer and they are static files like images, js and css. In this case when the user visit the webpage the static files are stored on his computer and when he visit it again the browser checks only if these files are changed or not, if they are not changed then the browser servers them from users computer so the website is loaded much faster as there is no need to make requests to the server for those files.
The difference between server cache and browser cache is that for example in server cache a query stored in RAM will be served to all visitors instead of browser cache when cached files are served to each user from his own computer after the first time he visits the website.
WordPress Cache – W3 Total Cache, WP Super Cache, WP Rocket
It has happened to all of us: when we navigate to a website if it is not really very very important to us and if it doesn’t load in 5-10 sec we hit the back or stop button on our browser. So if you are a website owner; first thing you have to do is to check your website speed and load time, because if it take more then 5 seconds that you are losing a lot of visitors.
If your website is using WordPress than you can save a lot of time and money to speed your website as there are some nice plugins on WordPress plugin directory that can help you speed your site.
So far so good, but how will you choose which one to use for your website?
First thing that you have to do is to check your website page speed without a cache plugin and identify your website problems and needs, what is slowing it?
You can check page speed with: GTmetrix or Google Pagespeed. There are a lot of other tools around the internet but these two are the most popular.
What are we going to do is: Testing an example website without any WordPress Cache plugin enabled and then we will test each plugin separately and decide based on some criteria:
Cost. Some of the plugins used for cache are free and some others with a paid subscription. But being a paid plugin doesn’t mean that it is better then those who are free.
Easy to install and configure. We will test each the three plugins mentioned above and measure the time needed to configure each one.
Functionality and compatibility. Not every cache plugin is compatible with your theme, server configuration, WordPress configuration or with other plugins you have installed on your website.
Support, forum and documentation. Based on your website configuration and your server not everything will work as you expected, so some times you may need some support on what you will want to achieve.
Testing without WordPress Cache plugins
First we are going to test a website without any cache plugin and see the website performance and speed. After that we will test the same website with WordPress Cache enabled and test each plugin separately.
The website that we will use for test is: www.emilushi.com which uses the same WordPress version, theme, plugins and content from www.shomtek.com.
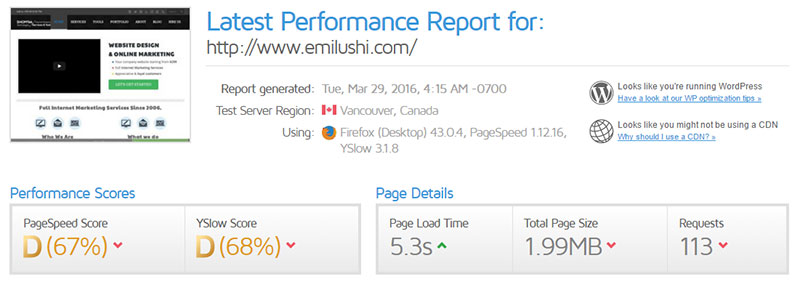
I’n the image below we may see the page-speed test of the webpage without any WordPress cache plugin enabled.
GTmetrix test for emilushi.com, without any cache plugin enabled.
The server where the tests are made is a Dedicated Cloud Server with 2GB of Ram, 2 Cores with latest Apache Version, Nginx as Reverse Proxy Server and PHP 5.6.19. The server is using Free version of CloudFlare.
Below is the result of the AB test (Apache stress test)
ab -n 1000 -c 100 http://www.emilushi.com/
The test above will send 1000 request to www.emilushi.com with 100 concurrent requests. We haven’t specified the time for test as we want to know which will be the maximum number of requests made per second. result:
Concurrency Level: 100
Time taken for tests: 205.626 seconds
Complete requests: 1000
Failed requests: 0
Requests per second: 4.86 [#/sec] (mean)
Time per request: 20562.646 [ms] (mean)
Time per request: 205.626 [ms] (mean, across all concurrent requests)
Transfer rate: 6.59 [Kbytes/sec] received
Conclusion: Based on the tests made without any WordPress cache plugin enabled we have
Page-speed score: 67
YSlow score: 68
Page Load Time: 5.3s (not bad)
Requests per second:4.86
Now lets test the same website with cache plugins enabled and we will start with WP Super Cache.
WP Super Cache
WP Super Cache – A very fast caching engine for WordPress that produces static html files.
WP Super Cache is a free WordPress plugin created and maintained by Automatic with more than 1 million active installs and rated 4.2 out of 5 on the WordPress plugin directory.
What WP Super Cache does is: after the first visit it creates an html file for each page. Then the webpage will be served as a static html file for all the other users that will visit the website.
If you install WP Super Cache you will have to visit each page of your website to create the static file of each page so when a visitor will want to access you website it will be served from the cached file.
We will do the same server load test that we did before when we had no WordPress Cache plugin enable and test the server load time with WP Super Cache enabled and configured.
The test result for:
ab -n 1000 -c 100 http://www.emilushi.com/
is as below:
Concurrency Level: 100
Time taken for tests: 174.149 seconds
Complete requests: 1000
Requests per second: 5.74 [#/sec] (mean)
Time per request: 17414.932 [ms] (mean)
Time per request: 174.149 [ms] (mean, across all concurrent requests)
Transfer rate: 470.97 [Kbytes/sec] received
As we can see from the result above we have saved 31.477s from the total time needed to take the test and the Requests per second is increased with 0.88 requests/s, it’s only a bit better that the website version without a WordPress Cache plugin.
Below you can watch a video that we have recorded testing the time needed for plugin installation, configuration and the page speed scored with cache enabled.
W3 Total Cache
W3 Total Cache – A WordPress Cache plugin that will speed your website.
W3 Total Cache is a very complex plugin with full of free and premium features. It supports Web Browser cache, Database cache, Object cache, HTML CSS and Javascript minification as well some other third party API like, New Relic or CDN like Max CDN.
What i really like from it is that W3 Total Cache supports opcode cache and memcached. So if you have a server configured to work with memcached your website will be much faster otherwise you will have to use disk cache which is a some how slower then using memcached.
We have taken the same Apache stress test that we did using WP Super Cache and the result is as above:
Concurrency Level: 100
Time taken for tests: 164.136 seconds
Complete requests: 1000
Requests per second: 6.09 [#/sec] (mean)
Time per request: 16413.563 [ms] (mean)
Time per request: 164.136 [ms] (mean, across all concurrent requests)
Transfer rate: 395.38 [Kbytes/sec] received
As we can see from the test result W3 Total Cache is better the WP Super Cache but the performance improvement is not that big. So we have saved only 10s from Total time needed to take the test and only few points from Requests per second.
Watch the view below that we have recorded to test time needed to install and configure W3 Total Cache and as well the test we did on GTmetrix.
WP Rocket
WP Rocket launches upon activation – minimal configuration, immediate results.
WP Rocket is a commercial plugin, so you will not find it on WordPress repository, instead you will have to buy a license from WP-Rocket.me and install the plugin manually.
Based on my experience WP Rocket is the most useful cache plugin that i have ever used on my website or on our clients websites.
What i most like on WP Rocket is that the plugin minifies all CSS files that you may have on your website and than it combines them in one CSS file, it does the same for all JavaScript files. This features helps you decrease the number of requests that are made on a server every time that a visitor comes to your website.
Other features that are supported on WP Rocked are: LazyLoad for images and embed video, DNS prefetch, CloudFlare Compatibility, CDN, Varnish Caching Purge etc.
Another feature that will become available soon is the fragment cache. What fragment cache does is: it helps you cache all the page of a website instead of a dynamic part of it, so if you have a block of code that changes every page load or every specific time you will not want to cache that part as it will brake the function, so by using fragment cache you may cache or not specific blocks of code inside a single page.
At the moment if you will need to use fragment cache then you will have to use W3 Total Cache as it supports fragment caching.
Below you will find the Apache stress test we did with WP Rocket enabled.
Concurrency Level: 100
Time taken for tests: 125.145 seconds
Complete requests: 1000
Requests per second: 7.99 [#/sec] (mean)
Time per request: 12514.536 [ms] (mean)
Time per request: 125.145 [ms] (mean, across all concurrent requests)
Transfer rate: 445.18 [Kbytes/sec] received
As we can see from the test WP Rocket is much more faster then the other two plugins we have tested before. The total time needed for test 40s less the W3 Total Cache and as well the number of request per second is about 2 which mean that we may have 2 more requests per second compared to W3 Total Cache, about 2.5 requests more than WP Super Cache and about 3.5 requests more than we had with no WordPress Cache plugin enabled.
We have recorded a video as we did before with the other two plugins to test the time needed for the configuration and the pagespeed using GTmetrix. You can watch the video below.
Conclusion
Based on all the test we have made we may say that WP Rocket is faster then the other two plugins. If you will want to use a free plugin then you will have to try W3 Total Cache.
Remember that you can’t have same results on different servers and on different websites as the pagespeed and plugin configuration will be depended on your server configuration, other plugins that you are using on your website and as well on your WordPress theme as well.
In the chart below you may see all the important results for all the three plugins and decide which one to use.
Fixing WP Rocket “bug”
If you will have the same error that I had when configuring WP Rocket on the video above, than you will have to follow the below steps:
1. Navigate to WordPress plugin folder and then go to:
/wp-rocket/inc/functions/
open minify.php, go to line 74 and replace this:
$base_url = WP_ROCKET_URL . 'min/?f=';
with:
$base_url = WP_ROCKET_URL . 'min/index.php?f=';
2.Navigate to WordPress plugin folder and then go to:
/wp-rocket/min/
open .htaccess file and replace all the content of file with this:
DirectoryIndex index.php
<Files index.php>
 Order allow,deny
 Allow from all
 Require all granted
</Files>
<IfModule mod_rewrite.c>
RewriteEngine on
RewriteBase /min
RewriteRule ^([bfg]=.*) index.php?$1 [L,NE]
</IfModule>
<IfModule mod_env.c>
SetEnv no-gzip
</IfModule>
At first we will explain what are structured data and why are they needed for a website. In this blog will walk through the structured data used in a blog post, what are they, why are they needed, where to test them and where to get more info.
What are structured data (rich snippets)?
Rich snippets are some html tags used around before every section of the website content. First of all you will start by putting the correct tag at beginning of you website based on it’s purpose so for example if it is a blog category you will start by:
This part will tell to a web-crawl that the purpose of this page is Blogging, and the web-crawl will search for other required data, like: Post title, post image, author, date created, date modified etc.
The rich snippets are used for almost everything that can be showed through the web, for a person (his work, address, his parents, siblings etc), for a product (product name, manufacture, price, rating etc), for an event (event name, event date, venue etc). So almost every section of a webpage can have it’s corresponding structured data.
Based on a 2014 web crawl extraction the most used format by web developers for structured data is RDFa followed by Microdata.
Which one to use? It’s hard to say which one to use because everyone of them has it’s unique purpose but both RDFa and Microdata do almost the same so deciding between these two is up you. In most of the cases I will use Microdata as it is much more simple to use, both of them are HTML5 standards.
<h2>
 <a href="structured-data-and-google-testing-tool">
 <span>Blog post structured data and Google testing tool</span>
 </a>
</h2>
<div vocab="http://schema.org/" typeof="Blog">
 <h2 typeof="BlogPosting" resource="structured-data-and-google-testing-tool">
 <a property="url" href="structured-data-and-google-testing-tool">
 <span property="name">Blog post structured data and Google testing tool</span>
 </a>
 </h2>
</div>
<div itemscope="" itemtype="http://schema.org/Blog">
 <div itemscope="" itemtype="http://schema.org/BlogPosting">
 <h2 itemprop="headline">
 <a itemprop="url" href="structured-data-and-google-testing-tool">
 <span itemprop="name">Blog post structured data and Google testing tool</span>
 </a>
 </h2>
 </div>
</div>
Which is the purpose of using rich snippets on our website?
Structured data – search result
As we mentioned in the first section Structured Data are some HTML tags which are not visible on your website front page, so your visitors will not see them without viewing website source.
The purpose of structured data is to help a web crawls categorizing the information that they collect on a website or web application.
The most comune use of the information collected is showing it in a search result based on a user query to search on a search engine like Google.
If your website is not populated with the structured data then the crawl will show on a search result now all the information that a user may need or it will not show it as you thing that was going to be, so if you don’t add the appropriate tag for the image of you blog post it will not show up on a search result, or if you don’t add the posted date tag or author tag this info will not show up on a search result, as well websites with no structured data will have a lower SEO score and having lower SEO score means having less visitors on your website.
In general setting Structured Data correct in your website will increase the probability to show up in a search result which will increase your visitors numbers and as well will increase your website ranging among all search engines.
Where do you test your website Structured Data?
There are a lot of tools around the internet which will help you testing your structured data implementation but the mos used one is the one provided by Google (Google Testing Tool).
Structured Data Testing Tool Result
In the image above is a result from Google tool and as we see every tag entered on this test website has passed all the Google requirement. There is something in here to be mentioned: Not all the tags are required even if Google structured data tool shows an error for a missing tag.
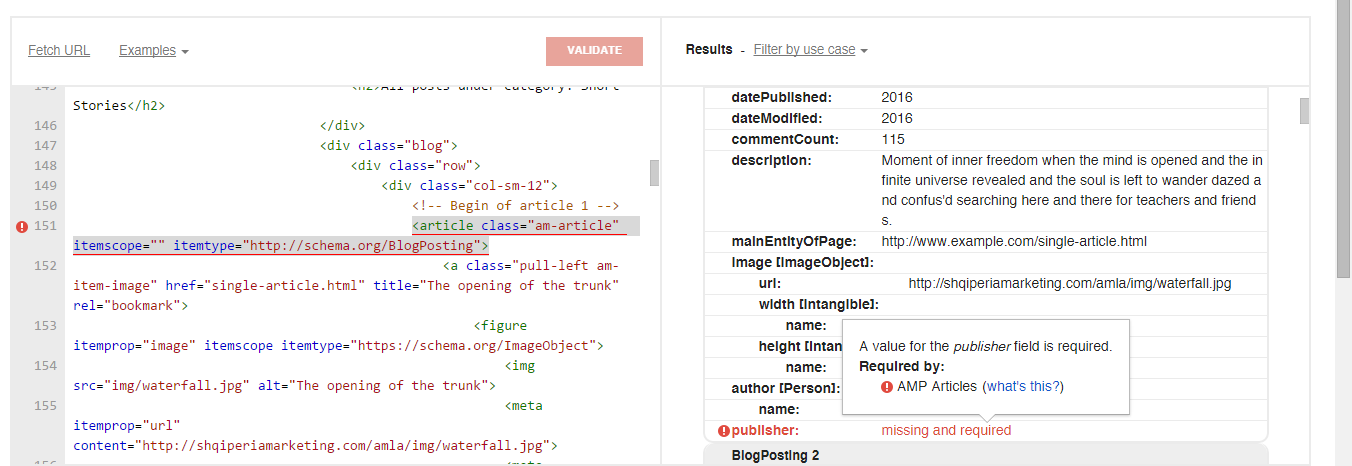
Structured Data Testing Tool error
As we see in the above image there is a error showed on the testing tool, the error tells us that the blog post is missing the publisher which has to be an organization, this is a tag required only by Google, I’m saying only by Google because it doesn’t make sens to be required, for example a personal blog will not have a publisher. As well logically it is not required for a blog post to have an image but this is a tag required by Google structured data testing tool.
What really makes sense to be required on a blog post is: Title tag, Author tag, Posted date tag and article body. Personally i think that all the other options has to be optional.
An example of error free blog post will as below:
<!doctype html>
<!-- Main purpose of the webpage -->
<html dir="ltr" itemscope="" itemtype="http://schema.org/Blog" lang="en">

<head>styles and scripts will be included in here</head>

<body>
 <!-- Blog post starts here -->
 <section itemscope itemtype="http://schema.org/BlogPosting">
 <!-- Headline - title tag -->
 <div itemprop="headline">
 <h1 itemprop="name">The black cat</h1>
 </div>
 <!-- Posted date -->
 <time datetime="1843-08-19" itemprop="datePublished">August 19, 1843</time>
 <!-- Author tag -->
 <a href="#" title="Edgar Allan Poe" itemprop="author" itemscope itemtype="https://schema.org/Person">
 <span itemprop="name">Edgar Allan Poe</span>
 </a>
 <!-- Main post image -->
 <figure itemprop="image" itemscope itemtype="https://schema.org/ImageObject">
 <img src="img/the-black-cat.jpg" alt="The Black Cat">
 <meta itemprop="url" content="http://shomtek.com/img/the-black-cat.jpg">
 <meta itemprop="width" content="300">
 <meta itemprop="height" content="374">
 </figure>
 <!-- The post content -->
 <div itemprop="articleBody">
 <p>Article content will go here</p>
 </div>
 <!-- Some invisible tags to satisfy Google -->
 <div class="invisible">
 <a itemprop="mainEntityOfPage" href="your-canonical-post-url">The black cat</a>
 <meta itemprop="dateModified" content="1843-08-19" />
 <div itemprop="publisher" itemscope itemtype="https://schema.org/Organization">
 <div itemprop="logo" itemscope itemtype="https://schema.org/ImageObject">
 <img src="//www.shomtek.com/wp-content/uploads/2014/01/logo.png" alt="SHOMTek">
 <meta itemprop="url" content="http://www.shomtek.com/wp-content/uploads/2014/01/logo.png">
 <meta itemprop="width" content="292">
 <meta itemprop="height" content="85">
 </div>
 <meta itemprop="name" content="SHOMTek">
 </div>
 </div>
 </section>
</body>
</html>
For more detailed information about Structured Data you can always visit the websites below, but be careful as you’ll lost :p